[Spring Cloud] Kafka를 이용해 Config Bus 적용하기
2022. 8. 29. 18:32ㆍWeb/spring-boot
1. Spring Cloud Bus는 왜 필요한가?
- 평소 Spring Cloud Config 만 적용했을 경우 설정 정보가 변경될 경우 변경된 마이크로서비스에서
/actuator/refresh 를 호출해서 변경을 했었다.
- 하지만, 이렇게 하면 매번 설정 정보가 변경 될 때마다 엔드포인트를 호출해 변경정보를 반영하는게 굉장히
번거로운 일이다. 이러한 문제를 해결하기위해서 클라이언트에서 Spring Cloud Bus와 Queue를 이용하여
설정 정보를 한번에 변경하는 것이 Spring Cloud Bus 이다.
- 나는 현재 회사에서 Kafka를 주로 사용하고 있으므로, 메세지큐는 Kafka를 이용하여 구현해 보았다.
- 선호도나 프로젝트 성향에 따라 RabbitMQ나 Kakfa 등 선택을 하면 될 거같다.

2. Docker를 이용한 Kafka 설치
# docker-compose.yaml
version: '3'
services:
  zookeeper:
    image: confluentinc/cp-zookeeper:latest
    environment:
      ZOOKEEPER_CLIENT_PORT: 2181
      ZOOKEEPER_TICK_TIME: 2000
    ports:
      - 22181:2181

  kafka:
    image: confluentinc/cp-kafka:latest
    depends_on:
      - zookeeper
    ports:
      - 9092:9092
    environment:
      KAFKA_BROKER_ID: 1
      KAFKA_ZOOKEEPER_CONNECT: zookeeper:2181
      KAFKA_ADVERTISED_LISTENERS: PLAINTEXT://kafka:9092,PLAINTEXT_HOST://localhost:9092
      KAFKA_LISTENER_SECURITY_PROTOCOL_MAP: PLAINTEXT:PLAINTEXT,PLAINTEXT_HOST:PLAINTEXT
      KAFKA_INTER_BROKER_LISTENER_NAME: PLAINTEXT
KAFKA_OFFSETS_TOPIC_REPLICATION_FACTOR: 1| docker-compose up -d |
3. Config Server 설정
- 먼저 해당 Dependency를 추가해주도록 하자.
<dependency>
   <groupId>org.springframework.cloud</groupId>
   <artifactId>spring-cloud-config-server</artifactId>
</dependency>
<dependency>
   <groupId>org.springframework.boot</groupId>
   <artifactId>spring-boot-starter-actuator</artifactId>
</dependency>
<dependency>
   <groupId>org.springframework.cloud</groupId>
   <artifactId>spring-cloud-starter-bus-kafka</artifactId>
</dependency>
- application.yml
server:
  port: 9900

spring:
  application:
    name: config-server
  cloud:
    config:
      server:
        git:
          uri: 깃허브주소
          username: 이름
          password: 깃토큰
    bus:
      refresh:
        enabled: true
      enabled: true

//카프카 주소
  kafka:
    bootstrap-servers: localhost:9092
이렇게 하면 Config Server의 설정은 끝났다고 볼수있다.
4. Config Client 설정
- 이제 각 마이크로서비스들의 설정을 해줘야 한다.
- 먼저 똑같이 Dependency 추가
<dependency>
   <groupId>org.springframework.cloud</groupId>
   <artifactId>spring-cloud-starter-bus-kafka</artifactId>
</dependency>
<dependency>
   <groupId>org.springframework.boot</groupId>
   <artifactId>spring-boot-starter-actuator</artifactId>
</dependency>
spring:
application:
name: user-service
profiles:
active: local
config:
import: optional:configserver:http://localhost:9900
kafka:
bootstrap-servers: localhost:9092
cloud:
bus:
enabled: true
refresh:
enabled: true
env:
enabled: true
server:
port: 80025. Spring Actuator 확인
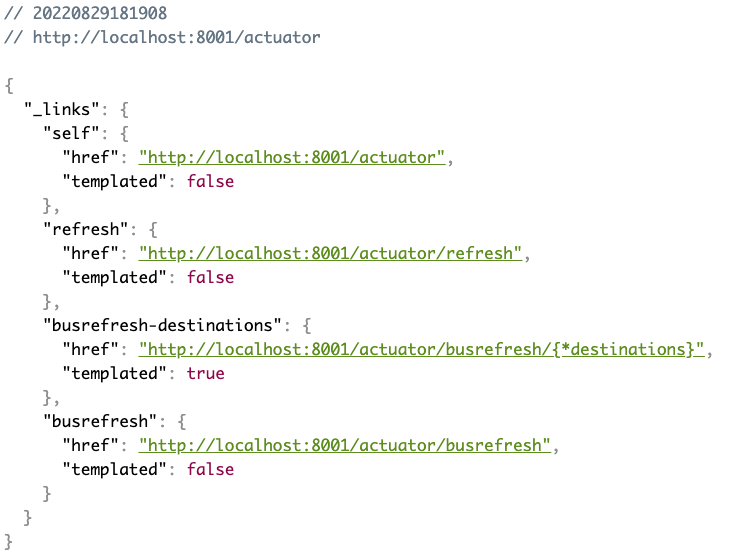
이제 여러개로 구성된 클라이언트를 하나씩 모두 호출할 필요가 없이 하나의 게이트웨이 호출해주면 모든 클라이언트가 값이 적용된다.
$ curl -X POST "http://localhost:8001/actuator/busrefresh"
'Web > spring-boot' 카테고리의 다른 글
| [Spring] AOP 와 커스텀 어노테이션을 활용한 Logging (0) | 2022.09.05 |
|---|---|
| [Spring] Annotation의 원리와 Custom Annotation 만들기 (0) | 2022.09.05 |
| [SPRING CLOUD] Config 서버 구축하기 (1) | 2022.08.25 |
| [SPRING] 마이크로서비스(MSA) 간 통신방법 (0) | 2022.08.10 |
| [Spring] GraphQL 적용해보기(io.leangen.graphql) (0) | 2022.06.08 |